
pierced relief carving step by step

drawing out design
After looking at approx 20 different examples of this type of work, I
drew out my original design, directly onto the wood. It will be a floral
design, with petaled flowers, buds, leaves and tendrils. In free-handing
this design i worked from the center out and mirrored the image on both
sides. I tried to keep the tendrils connected as much as possible to the
rest of the work to give maximum support to the delicate hanging
tendrils. (35 min work)

color coding
In order to ready it for the scroll saw work, I color coded the design,
black was the area of the design that would be cut around and red were
the areas to be certain not to cut out. (5 min. work)

design completed
this is the final design, ready to be cut on the scroll saw.
Drilling guide holes
Using my drill press, I then drilled holes into all places that would
require interior cuts. (you can use a hand drill to do this, being
careful to keep the bit 90o vertical to the board) interior cuts cannot
be accessed from the edge of the board. Holes are drilled so that the
scroll saw blade can be inserted and the inside areas cut out. (5 min.
work)

cutting away the waste
using a scroll saw, I selected a size 3 spiral blade. Spiral blades must
be used for the piercing as the work is too large for the 16" capacity
of my scroll saw. spiral blades allow you to cut in any direction. All
interior cuts must be made first to give support to those pieces so they
don't break off. next step is to cut all the exterior waste off.
(interior-1.25 hr work, exterior- 1.75 hr work)
waste removed

at this point all of the waste, interior and exterior has been removed.
The final demensions are 32" long, with the arch being 6" wide

close-up
close up of final pattern now ready for carving. from this point on, the
carving will be very delicate to work with because there are a lot of
unsupported tendrils. I will lay it flat out on top of my workbench for
the carving, using an anti-slip mat under it so that it will not require
clamping down. using clamps at this point would likely break off some
of the unsupported tendrils.

carving tools selected
as this will be a delicate carving I have selected small hand tools to
do the job. Left to right: #5 gouge, #7 gouge, #1 bent gouge, sloyd
knife, 60o v-tool and a #3 fishtail gouge. After selecting tools 1st
step is to hone them so that they will slice thru the wood cleanly. They
will be honed repeatedly over the course of the carving stage. this is
an important step in this carving as any unneeded pressure will break
off the delicate pieces.

begin carving
first step is to use a v tool to separate all flower petals, leaves,
buds and tendrils. I will start carving at the strongest points of the
carving, working my way down to the most delicate pieces, allowing those
pieces to be supported as long as possible

carving the pansy

gouge out the center of each petal

make a stop cut around the center mound

gouge out 1/4 of each petal in towards the center

round over the outside edge of each petal

round over the center mound

redefine the valley between each petal using a v-tool

using a gouge round over the top of each half of the petals

using a knife, make a v cut between each petal to define the separation

using a knife clean out and define area between the petals

clean up area around center mound

using a v-tool, put 2 or 3 wrinkle lines into bottom 1/3 of each pedal, working in to center

Carving The Daisy

after making a stop cut around the center mound, gouge out about 1/4 of each petal, going down and into the center

Round over the edges of each petal

round off the last 1/4 of each petal and then shape the sides of the petal

round off the top of each petal

do another stop cut around center mound

clean up the center mound

round over center mound

redefine the valley between the petals using the v-tool

using a knife, make a very steep v cut which will separate the petals more

redefine edges of petals going deeper in the area between each petal

finished daisy

texturing the button
using a nail, gently tap in many random spots on center mound to create texture. Texture the buttons on all the pansies and daisies

Carving the leaves

Gouge out a section approx. halfway on the leaf. This will give a wave to each leaf.

leaf gouged out

after making a stop cut along the edge of the petal, gouge out 1/4 of leaf in towards the flower

using a gouge remove the end of the leaf

round off and shape each leaf

after rounding the leaf over use either a knife or small v-tool to make veins. make a curvy line down the center of each leaf and then make veins from the center line out to the edges angled to the tip of the leaf

pansy and leaves carved

carving the bud

first shave off 1/2 of the edge from center out to tip of bud, then make a stop cut along base of bud

gouge out stem into base of bud

round off base of bud

round over top of bud

using a v-tool, make curvy line from base to tip of bud

carving the tendrils and bud stems

Make a stop cut where stem attaches to flower

gouge out stem in towards flower, remove enough wood so that the level of the stems and tendrils are lower than the flowers and buds

make stop cuts wherever tendrils meet each other and where they meet flowers

round over stem working in towards flower

completed bud stem


continue rounding over all stems and tendrils

cleaning up the carving
this is much to delicate a piece to do any hand sanding on. I have cleaned it up using rotary power tool with a fine ceramic pointed stone

tendrils and bud stems completed

I used a different stain on each part of the design

carving stained

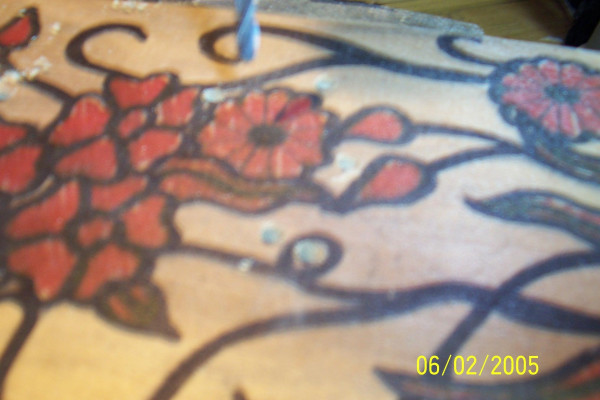
painting
I used thinned water colors to tint the carving


completed caving
carving mounted over archway
...................................................................
Of all, this is truly my favorite! A lot of work with the scroll saw
and hand tools, but the paint job to achieve the colors are what amaze
me. Almost like a stain glass look. Really nice job on the whole
project.
Oct. 26, 2008 By: banjo52us Delete
A very nicely done carving and an excellent tutorial
Jun. 8, 2007 By: Charles Hand Delete
No comments:
Post a Comment